Thursday, December 25, 2008

The Program Structure

The program consists of one assembly "BasicSimulator.exe" containing three namespaces
  • BasicSimulator
  • BasicSimulator.CircuitElements
  • BasicSimulator.Math

The BasicSimulator namespace


I will now present the most notable classes in the namespace BasicSimulator.

The class DomParser is responsible for validating and parsing the Document Object Model (DOM) trees representing the input files: circuit files and analysis command files.

The class Analyst can perform two types of analysis: operating point and DC sweep analysis.
Analyst does not contain the details of how element contributions are stamped or how linear equations are solved. Such details are the responsibility of worker classes controlled by Analyst. Analyst is only concerned with the high-level steps.

The class ResQueryProcessor contains the method Execute which validates and parses ResQueries. It then returns a data structure containing the requested analysis results.

The UIManager class is responsible for the user interface. It gets ResQueries from the user and forwards them to ResQueryProcessor.Execute. It then formats and presents the contents of the data structures returned by the method.
The user interacts with the ResQueryProcessor through the UIManager.


The class Program contains the Main method of the program. Main processes the command-line arguments and loads the input files.


The BasicSimulator.CircuitElements namespace

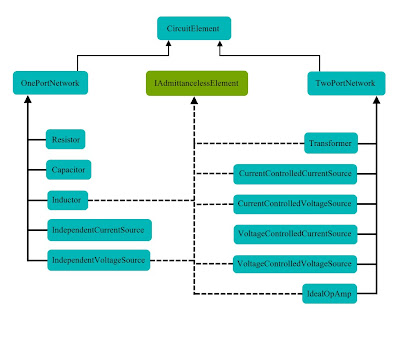
This namespace contains the classes that represent the circuit elements supported by the simulator (Resistor, Inductor, IndependentVoltageSource, ...etc) and the base classes from which the element specific classes derive.

The following figure shows the inheritance hierarchy of the circuit element classes.


All elements that, in the context of DC analysis, do not have an admittance description, implement IAdmittancelessElement. This interface has two member properties:
  • ExcessEquationsCount: The value of this property is hard-coded in the element definition. It is needed when numbering the elements that do not have an admittance description (refer back to the formulation step 2 in my post "Circuit Formulation").
  • FirstExcessEquationIndex: The value of this property is set by the client. It is needed when stamping the admittanceless element contribution.

There is two other circuit elements that only make sense in the context of DC sweep analysis: SweepableCurrentSource and SweepableVoltageSource.


The classes that implement ISweepableSource should expose the properties StartingValue, StoppingValue, IncrementingValue, and the method StampIncrement.
The current version of the simulator supports circuits with only one sweepable source.

CircuitElement and its children decorate some of their properties with the AnalysisResultAttribute attribute. This means that the target property gets or derives an analysis result related to the element from the values in the solution vector.
For example the class Resistor decorates two of its properties with the AnalysisResultAttribute attribute: VoltageDrop and Current. It also inherits from OnePortNetwork the property PowerConsumption which is decorated with the same attribute.
The ResQueryProcessor uses reflection to get the names and values of the properties decorated with the AnalysisResultAttribute attribute for the circuit element specified in the ResQuery. These analysis results are then displayed to the user by the UIManager.


The namespace BasicSimulator.Math

This namespace contains the class LinearEquations which was discussed in my previous post "The LinearEquations Class".

Saturday, October 25, 2008

BasicSimulator Released

Today, I release my first circuit simulator. I worked a lot on this project and I am very satisfied with the results.

In this post, I will present the functionality and limitations of BasicSimulator (this is the name I chose for my program), and I will explain how to use it. A link to download the source code and binaries of the program can be found at the end of this post.


Functionality and Limitations

The BasicSimulator can perform two types of DC analysis: operating point analysis and DC sweep. All circuit elements supported by the simulator are linear elements. It cannot simulate circuits with diodes, transistors, or any nonlinear element. Here is a list of all supported circuit elements.
  • Resistors
  • Capacitors
  • Inductors
  • Independent voltage sources
  • Independent current sources
  • Voltage controlled voltage sources
  • Voltage controlled current sources
  • Current controlled voltage sources
  • Current controlled current sources
  • Ideal OpAmps
  • Transformers
With DC, capacitors are just open circuits, and inductors and transformers are just short circuits. These elements are not very important in a simulator that can only perform DC analysis, but I included them anyway.


Input Files

The input to the simulator consists of two XML files, the first contains the circuit description, and the second contains the analysis command. The paths to the files should be passed to the program as command line arguments.

BasicSimulator <circuit file> <analysis command file>


1) The circuit description file

Circuits are described using the Circuit Description Language (CDL) which is an XML-based language invented by myself. I wrote an XML Schema to formally define the CDL and to validate the user files before parsing them. The Schema file can be found at
...\BasicSimulator\BasicSimulator\Schemas\CDL.xsd
The CDL is defined in the XML namespace
Bassem.BasicSimulator.CDL
Instance documents should create an alias for this namespace and prefix the root element
<Circuit> with this alias.

<cdl:Circuit xmlns:cdl="Bassem.BasicSimulator.CDL">
    ...

   <!-- circuit description here -->
    ...

</Circuit>


Because CDL is an XML-based language, it is self-descriptive. The user can learn it from the circuit files I used to test the program. These can be found at
...\BasicSimulator\BasicSimulator\Tests\Test1\Circuit.xml,
...\BasicSimulator\BasicSimulator\Tests\Test2\Circuit.xml, and
...\BasicSimulator\BasicSimulator\Tests\Test3\Circuit.xml.

2) The analysis command file

The analysis command specifies the type of analysis to be performed. Depending on the type of analysis, it may or may not contain additional information. To request an operating point analysis, only the type of analysis needs to be specified in the analysis command file. If a DC sweep analysis is requested, the user should provide the ID of the independent source which value is to be swept, the starting value of the sweep, the stopping value, and the size of the increment.

The XML schema document that specifies the structure of the analysis command file can be found at
...\BasicSimulator\BasicSimulator\Schemas\AnalysisCommand.xsd
The namespace of the XML vocabulary used in analysis command files is
Bassem.BasicSimulator.AnalysisCommand

The following analysis command specifies that operating point analysis should be performed on the circuit.

<ac:OperatingPoint xmlns:ac="Bassem.BasicSimulator.AnalysisCommands" />


The following analysis command specifies that DC sweep analysis should be performed on the circuit by sweeping the value of the independent source 'V7' from 0 to 30 with a step size of 5.

<ac:DCSweep xmlns:ac="Bassem.BasicSimulator.AnalysisCommands">
    <SourceName>V7</SourceName>
    <Start>0</Start>
    <Stop>30</Stop>
    <Increment>5</Increment>
</ac:DCSweep>


Querying the Analysis Results

The ResQuery is the language used to query the analysis results. Again, this is a language invented by myself. It is very simple. A ResQuery has one of two forms:

node:<node name>
element:<element ID>


The first query gets the node voltage or voltages depending on the analysis type. The second query gets the analysis results associated with the element. For example if the element is a current controlled voltage source, the query will get the value(s) of the input current, the output voltage drop, the output current, and the power consumption in the element.

Click here to download the source code and binaries of the BasicSimulator.

Tuesday, September 23, 2008

Circuit Formulation

Circuit formulation is the process of deriving from the circuit description a set of linear equations that can be solved to evaluate the desired voltages and currents.

In linear DC analysis - the only type of analysis that concerns me for now - the circuit needs to be formulated only once.

There exists many formulation techniques. Some are much better than the others. Examples of formulation techniques are:
  • The basic nodal formulation method which cannot handle circuit elements that are not current sources and do not have an admittance description.
  • The tableau formulation method which produces unnecessarily large matrices.
The formulation method I will present here is a variation of the modified nodal formulation. It is well explained in "Electronic Circuit & System Simulation Methods" (chapter 2) and in "Computer Methods for Circuit Analysis and Design" (section 4.4).
The method is better than the basic nodal formulation because it can handle all linear circuit elements. It is also better than the tableau formulation method because using the tableau formulation you get a solution vector containing all branch currents, all branch voltages, and all nodal voltages. Obviously, these quantities can be easily derived from each other.
The version of the modified nodal formulation I will present next gives much smaller matrices. The solution vector will contain only the nodal voltages and the currents through the elements that are not current sources and do not have an admittance description.

Formulation Steps

Step 1:
Number the circuit nodes consecutively. It is a good idea to give the ground node the number zero to facilitate the removal (or the neglect) of its nodal equation and of the coefficients of its voltage.

Step 2:
Number the elements that do not have an admittance description starting from "last node number" + 1. The number of the element will be the index of its first excess equation and also the index of its first excess unknown (elements without an admittance description introduce excess equations and excess unknowns into the set of equations).
Some elements have more than one excess equation (excess unknown), so the elements may not be numbered consecutively.

Step 3:
Scan all the circuit elements to add the element contributions to the set of linear equations. The contribution of an element is represented by a small matrix that is sometimes called the matrix stamp. The following figure shows the matrix stamps of the resistor, the independent current source, and the independent voltage source.


The complete list of ideal element stamps can be found in "Computer Methods for Circuit Analysis and Design" pages 116 and 117.

The independent voltage source is an example of an element that do not have an admittance description, it adds an excess equation and an excess current to the set of linear equations. In the matrix stamp of the independent voltage source, 'm' is the number of the element.

You stamp in an element contribution by adding the elements of its matrix stamp to the corresponding elements of the coefficients matrix and/or the RHS vector.

Saturday, September 20, 2008

The LinearEquations Class

The LinearEquations class encapsulates
  1. data structures to store the representation of a set of linear equations and
  2. methods to solve the linear equations.


The elements of the matrix and the vectors are stored in zero-based arrays but the elements at index zero (row zero and column zero for the matrix) are completely ignored by the solution routine.
This is convenient because the formulation routine will produce an equation for every node, the nodal equations are linearly dependent and one of them must be ignored for the set to become linearly independent. We chose to ignore the equation at index zero which is the equation of the ground node.
Also, the coefficients at column zero are the coefficients of the ground voltage which is known to be zero, so we can safely remove the column zero from the matrix and the unknown at index zero from the solution vector.

Internally, the LinearEquations class uses the same two-dimensional array to store the coefficients matrix before the LU factorization and both the L and U matrices after the factorization. Before the factorization, the two-dimensional array is accessible through the property Coefficients and after the factorization it cannot be accessed.
Also, the same array is used to store the RHS vector before the solution and the solution vector after the solution process. Before solving, the array is accessible through the property Rhs, and after the solution it is accessible through the property Solution.

The values of the properties CurrentMatrixState and CurrentVectorContent determine the state of the LinearEquations object.


In state 1, using the Solution property causes an ApplicationException to be thrown.
In state 2, using the Coefficients property or the Solution property causes an ApplicationException to be thrown.
In state 3, using the Coefficients property or the Rhs property causes an ApplicationException to be thrown.

Click here to download the LinearEquationSolver project which includes the LinearEquations class. The project was created and built using the express edition of Visual Studio 2008.
Please note that the class Program was written just to test the other classes, and that it is not intended for reuse. It does not perform any checking on the format of the input file.

Thursday, September 18, 2008

Solution of Linear Equations

The formulation algorithm should produce a system of linear equations that has a solution.
For the system to have a solution, the number of equations must be equal to the number of unknowns and the coefficients matrix must be nonsingular (its determinant must not be equal to zero).

Five of the methods that can be used to solve sets of linear equations are
  1. the inverse matrix
  2. Carmer's rule
  3. Gauss-Seidel
  4. Gaussian elimination
  5. LU factorization
The inverse matrix and Carmer's rule methods are computationally expensive and are seldom used in computer applications.
Gauss-Seidel is an iterative method that may not converge even if the system of linear equations has a solution.
In the field of computerized circuit analysis, the solution of linear equations is usually performed using either Gaussian elimination or LU factorization.

The Gaussian elimination and the LU factorization algorithms are approximately of equal complexity (the complexity of the Gaussian elimination is slightly smaller).
The LU factorization is better in situations where we want to solve multiple sets of linear equations having equal coefficients matrices but different RHS vectors. Such situations arise when performing sensitivity analysis.

In my programs, I will use the LU factorization technique to solve linear equations.


Solution of Linear Equations by LU Factorization

The algorithm is explained very well in "Electronic Circuit & System Simulation Methods" and in "Computer Methods for Circuit Analysis and Design". Here, I will discuss the high level steps without going into the details of the algorithm.

Step 1: LU factorization
Factorize the coefficients matrix into an upper triangular matrix and a lower triangular matrix.


Step 2: Forward substitution
Consider the product [U][x] to be an unknown vector and solve for this vector.


This step is called forward substitution because you start by evaluating the first unknown in the vector [z] using the first equation and end by evaluating the last unknown using the last equation.

Step 3: Back substitution
Evaluate the unknown vector [x] from

[U][x] = [z]

This step is called back substitution because you start by evaluating the last unknown in the vector [x] using the last equation and end by evaluating the first unknown using the first equation.

To solve other sets of equations having the same LHS and different RHS vectors, we can reuse the factored matrix, only steps 2 and 3 need to be repeated.

Matrix Representation of Linear Equations

A set of linear equations can be represented in matrix form. Ex:


can be written in the matrix form as


or concisely

[a][x] = [b]

[a] is called the coefficients matrix.
[b] is called the Right Hand Side (RHS) vector.
[x] is called the solution vector.

The row index in the coefficients matrix and the index in the RHS vector represent the index of the equation.
The column index in the coefficients matrix and the index in the solution vector represent the index of the unknown.

Monday, September 15, 2008

Steps of Linear DC Analysis

Linear DC analysis is performed in two steps.

Step1: Formulation of the circuit equations.
Step 2: Solution of a system of linear equations.

I will use an example to illustrate these two steps.

WhiteCircit
The nodal equations for the above circuit are


Remember that in DC analysis, capacitors are replaced by open circuits.

The linear equations can be put in matrix form


The output of the formulation step is a set of linear equations like the one shown above.

In the solution step, the linear equations are solved to evaluate the vector of unknowns.

In my next posts I will present algorithms for formulating circuits and for solving sets of linear equations.

Sunday, September 14, 2008

What is linear DC analysis?

DC analysis in general (linear and nonlinear) is used to evaluate the steady state DC voltages and DC currents in the circuit.

During DC analysis
  1. Sinusoidal voltage sources and inductors are considered to be short circuits because the DC voltage across them must be zero.
  2. Sinusoidal current sources and capacitors are considered to be open circuits because the DC current through them must be zero.

Linear DC analysis is a special case of DC analysis where the circuit to be analyzed is made up of linear circuit elements.
In the context of DC analysis, a two-terminal element is linear if the relationship between the DC voltage across the element and the DC current through the element can be described by a linear equation.
The following I-V curves show that the ideal resistors, capacitors, inductors, voltage sources, and current sources are all linear elements.


Remember that the voltages and currents represented by the axes are DC voltages and DC currents.

For elements having more than two terminals, an element is linear if the relationships between DC currents and/or DC voltages imposed by the element can be described by a set of linear equations.
The current controlled voltage source for example is a linear element because the two equations describing its I-V behavior are linear.


To conclude, linear DC analysis is used to evaluate the steady state DC currents and DC voltages for a linear circuit.

My first simulator will perform linear DC analysis and linear DC analysis only.

Saturday, September 13, 2008

High-Level Statements and Decisions

Aim

Build my own circuit simulator.


Facts

I have very little knowledge of computerized circuit analysis and I am relatively new to programming.


Programming Language

C#.NET
The GUI will be built using Microsoft's new presentation framework: WPF.


Technical Resources
  • For circuit analysis algorithms

    1. Electronic Circuit & System Simulation Methods
      by T.L. Pillage, R.A. Rohrer, and C. Visweswariah

    2. Computer Methods for Circuit Analysis an Design
      by Jiri Vlach and Kishore Singhal


  • Programming resources

    1. Visual C# 2005 How to Program
      by H. M. Deitel and P. J. Deitel

    2. Programming WPF, 2nd edition
      by Chris Sells and Ian Griffiths

    3. Microsoft's official documentation of the C# programming language and the .Net framework.

Tools

  • I will use Visual C# 2008 Express (SP1) to build my first simulator. I might get the professional edition of Visual Studio from Microsoft DreamSpark, if I do, the professional edition will be used to build my next simulators.

  • SwitcherCAD III and the student version of CircuitMaker are free circuit simulators that I will use to test the accuracy and precision of the output of my programs.


General Strategy


I will not wait until I master the subject to begin coding, an early working simulator will boost my self confidence. I have no problem writing throw-away programs just to gain experience.
For the first releases I will not focus on the algorithmic efficiency as much as I will focus on functionality, also the first releases will probably not have a GUI.